
My Laundry Room Wasn't Working
- Alice
- May 2
- 4 min read
So I Redesigned it to Work and Wow!
As I grow as an interior designer, one truth keeps humbling me: good design takes time… and a lot of intention. It’s not just about making a space look beautiful. It’s about asking:
Does this layout actually make my life easier?
Will these materials hold up over time?
Am I solving the right problems—or just decorating over them?
Here’s the reality, you can have a “pretty” room that still doesn’t work. And that? Well, is just bad design.
This mindset shaped every decision in my laundry room renovation—a space that had potential, but wasn’t pulling its weight.

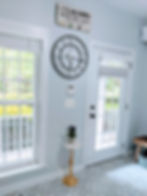
Before

Transition

After
Let's talk about what I started with…When my husband and I purchased our home, the laundry room had all the essentials: a small sink, a washer and dryer, and some tall wall cabinets. The vibe though????…Yellow-green walls with a very enthusiastic laundry-themed decor. For a generous sized room, the space planning was off and it didn’t function well—especially for a room we used every single day.
We did live with it for 5yrs (Yes! patience is a design strategy). But I must say, I made some tweaks to brighten-up the space. However, just like the prior owners I also added my own cheesy laundry room themed decor (see if you can spot it in the picture below). Because clearly, I was committed to the theme and just in case my family and guests forgot what room they were in, they had a little sign to remind them...LOL.
Using the space for that long, made the problem obvious. The room needed to be a laundry room and a mudroom. Which meant it had to handle a larger vanity with storage for buckets, laundry supplies, backpacks, ironing gadgets - yes, I am a graduate of Our Lady of Lourdes, and ironing is in my DNA. Also I needed a deep sink.

Speaking of storage, we needed some way to stack our washer and dryer, but keep it out-of-sight. We needed a place to store our broom and vacuum (bring on the jib door), and we needed room for coats, hats, mittens, you know all the winter gear that seems to be used year round these days. Because, hmmm, we are dealing with weather that can't seem to decide whether it is winter today, summer tomorrow, or spring next week. But I digressed!!


Now here’s another important factor:
This is the first room we (and our guests) see when we walk into the house. And believe me, no one wants that first impression to be: “Oh!!!…they are messy.”
Cue in my non-negotiables then...I got very clear on what success looked like:
Hidden storage for shoes (out of sight, out of stress)
A larger vanity with real storage (buckets, supplies, backpacks, ironing tools—because yes, as I said earlier, I iron)
A deep, functional sink
Closed storage for coats and seasonal items
A layout that actually flows
And of course… a space that feels beautiful.
Because function is step one darling—but joy is the goal.


A pretty room was a must, and a pretty room I created. Here's a synopsis of my process, one I follow for myself and clients - shameless plug - I am taking design clients. Back to the laundry room:
I Designed the Layout in CAD. Multiple iterations, because the first idea is rarely the best one.
I Created 3D Renderings and Elevations with My Team. That way my contractor and I were fully aligned before construction started.
I Developed a Realistic Budget Plus Contingency. Don't break ground/ start a renovation without a defined budget + a 10% buffer. If you don't do this, you will either: bust your budget, have to put the project on hold mid-construction, or go into debt and we don't want that for you.
I Chose Materials that Could Handle Real Life. This is a high-traffic, high-use space—durability was key. Think: solid brass switches; quality hardware; finishes that age well, not just photograph well.
I Worked with the Right Trades. Good design means nothing without good execution. The craftsmanship on this project made all the difference. A big shout out to Unique Kitchen and Baths for crafting my cabinets and ironing table. Their attention to detail and great customer service is bar none. I also want to thank Unique By Ruth for coming to my rescue when my cabinets got dinged and needed to be repainted and CertaPro Painters for painting my walls - painting a wall a deep saturated color like burgundy is tricky, and having a professional who can do it right is key.
I Layered in Personality. A little vintage, a little styling—because even a hardworking space deserves character.
Now? This room works with us, not against us. It's organized. It’s functional. It’s calm. And most importantly—it no longer feels like a catch-all for chaos. It's proof that when you design a space around how you actually live, everything changes.

One more thing! I don’t gatekeep—ever. If you’re wondering about:
Paint colors
Sources
Layout decisions
Or how to approach your own renovation

Sound-off in the comments—I genuinely love talking through this stuff.
And if you’re ready to create a space that actually works for your life, I’m currently taking interior design clients. You know where to find me.
Cheers ❤️